This board is arduino compatible. If you are using the Arduino IDE you must select the Leonardo board to upload the code. You can program this board of three ways at the moment:
- MRTScratch: In scratch mode directly
- BlockyDuino: Firstable you must create the program with blocks and then the code must be loaded in Arduino
- Arduino IDE: Directly in C code.
[heading_title]Important programming notes [/heading_title]
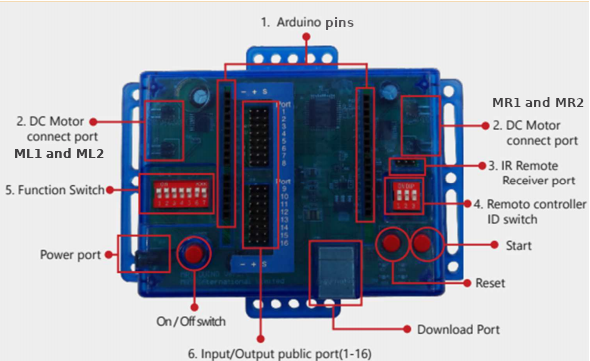
- The seven function switchs must be UP(point5 in the image). Is mandatory to use with all programming modes.
- If you are using Blockyduino you must download and install the Arduino IDE previously. Then you must select Leonardo board as default board or target.
- You can use the USB connecto to supply the board, but if you are using motors/servomotors the movement will be slow. If you are going to use motors/servomotor the external power supply is recommended (6-9 Volts), use the battery case included in the BeDuino kit.
- It is recommendable to program the speed of the motors more than 100 and use the gears to reduce the speed.
- If you are using Blockyduino and servomotors, the PWM doesn´t work in Port10. Advice: Connect some servomotor in this port. The passive buzzer use the tone library and this library use the PWM to generate a square wave to make a sound.If you are using servomotors the tone function won´t work in the port10.
- If you are using 2 or more buzzers or speaker, you must use the notone block after the tone block.
- Take care using the motors and functions in port13,14,15 and 16. For example if you are using I2C fucntion with LCD I2C display and you want to use two motors, use the ports 15 and 16, ML2 and MR2 motors instead of ML1 and MR1 connected to port13 and 14.Advice: If you use some motor is better don´t connect any sensor or actuator in the port of this motor to avoid problems. Another options if you want to use these ports then you can use the continous rotation servos to move the robot.
- The channel number to use the MRT remote control is configured in the three switchs(point4 in the image). Example all DOWN is the channel 1.
- If you are using Blockyduino, the remote control receiver must be connected From Port 13 to Port 16 because the remote control is managed using external interrupts. If you are using MRTScratch please connect in the remote control place (point3 in the image).
- To avoid the tedious step of manually pasting code to the Arduino IDE, you can run a mini webserver that uses the Arduino IDE to upload the code to a connected Arduino board on Windows, Mac OS X and Linux systems. Invoke this command from the BlocklyDuino root folder: python arduino_web_server.py
You can optionally specify the port with –port=COM3 (or –port=/dev/tty.foo on Linux and Mac); if you don’t, it will try and guess which port to use.
[heading_title]Pinout of MRTDuino board [/heading_title]
These tables summarice the correlations beetwen MRTduino ports and arduino pins and the functions of every pin/port:
| Port in MRT-duino Board | Arduino pin | Digital pins ( Input / Output) | Analog input pins (10 bits, 0-1023) |
PWM output (8bits, 0-255) |
UART BT o cable |
SPI | TWI / I2C | External Interrupts |
| Port 1 | 13 | 13 | PWM | |||||
| Port 2 | 15 | 15 | SCK | |||||
| Port 3 | 16 | 16 | MOSI | |||||
| Port 4 | 14 | 14 | MISO | |||||
| Port 5 | 18 | 18 | A0 – ADC7 | |||||
| Port 6 | 19 | 19 | A1 – ADC6 | |||||
| Port 7 | 20 | 20 | A2 – ADC5 | |||||
| Port 8 | 21 | 21 | A3 – ADC4 | |||||
| Port 9 | 5 | 5 | PWM | |||||
| Port 10 | 9 | 9 | A9 – ADC12 | PWM | ||||
| Port 11 | 11 | 11 | PWM | |||||
| Port 12 | 12 | 12 | A11- ADC9 | |||||
| Port 13 | 2 | 2 | SDA | INT1 | ||||
| Port 14 | 3 | 3 | PWM | SCL | INT0 | |||
| Port 15 | 0 | 0 | RxD1 | INT3 | ||||
| Port 16 | 1 | 1 | TxD1 | INT2 | ||||
| Remote control- IR Receiver | 10 | 10 | A10 – ADC13 | PWM | ||||
| Remote control – ID_SETTING_PORT_1 | 22 | 22 | A4 – ADC1 | |||||
| Remote control – ID_SETTING_PORT_2 | 23 | 23 | A5 – ADC0 | |||||
| MRTDUINO MOTORS | ||||||||
| MOTOR | Arduino pins | Port | ||||||
| ML1 | 3 | Port 14 | LOW backward and HIGH forward. | |||||
| MR1 | 2 | Port 13 | LOW backward and HIGH forward. | |||||
| ML1 | 7 | internal | PWM Value. SoftPWMSet function is called | |||||
| MR1 | 4 | internal | PWM Value. SoftPWMSet function is called | |||||
| ML2 | 1 | Port 16 | LOW backward and HIGH forward. | |||||
| MR2 | 0 | Port 15 | LOW backward and HIGH forward. | |||||
| ML2 | 8 | internal | PWM Value. SoftPWMSet function is called | |||||
| MR2 | 6 | internal | PWM Value. SoftPWMSet function is called | |||||